Note from the future:
We replaced this Prius transmission back when the 2001-2003 Prius was still a “new” car. It was a long time ago and I’ve learned a lot since. When I found this article sitting the drafts section after website overhaul, it was tempting to re-write history, so I came out looking a little smarter than I was. However, I think it’s better to represent the past honestly; nobody starts off an expert. I’ve edited some of my bad grammar and added some headings but left it otherwise untouched. I think it’s a good article. I hope you enjoy it.
![]()
The DIY Transaxle
The first time we encountered a bad HV transaxle was when a talented DIYer, and sometimes customer, brought his 2001 Prius in for us to check codes for him. We found a common electronic power steering code, which is almost always caused by a bad rack, but then we found something we hadn’t seen — an ominous-sounding P3009 – High Voltage Leak Detected code. At the time, we suspected that there might have been a problem with over application of sealer during the 40G HV battery service campaign, since a hybrid trainer had once told us he heard too much sealer had caused a HV leak on some Priuses.
We recommended he take his car to the dealer, just in case the fix turned out to be covered under the campaign or warranty. He called us after the dealer had checked it out, said the P3009 was caused by a bad transaxle, and told us it was not covered under warranty. Much to our surprise, he replaced the transaxle by himself at home. When he was done, he came by and we cleared the codes for him.
The used part didn’t last long
Seven months later, the warning triangle came on again, and he came by for us to check codes. Another P3009. We offered to buy a megger and do the testing for him, but he opted to have the dealer do the diagnosis again. He emailed a while later to say they found the same problem again — a bad HV transaxle. The first used transaxle had been purchased on eBay, and was now out of warranty. Since he now had more HV transaxle experience than most professional mechanics, he went back home, and put another used unit in. When he was done, we cleared codes for him, and as far as I know, it’s still working OK.
While we didn’t get the experience of doing the diagnosis or replacement on his car, we did learn some valuable information we’ve been able to use since. Chief among the lessons learned, it’s probably best not to install a used transaxle in a first generation Prius because MG2 failure seems to be a fairly common problem.
It’s been 5 months since his second visit, and we’ve had a chance to do the diagnosis and repair for some of our own HV transaxle projects. So far, we’ve done two first generation Prius transaxles, so we’re starting to catch up with the hardcore DIY’ers out there 🙂
A Quick Safety Note
This is not a step by step guide to working on Priuses. It is VERY hard to electrocute yourself with a Prius, and there are a lot of safety interlocks built into this car, and there’s no reason to fear hybrids if you are a good mechanic or smart person who reads instructions.
But…..
It is possible to do yourself harm if you don’t bother to read and understand the technical & safety information Toyota has available on their website http://techinfo.toyota.com.
The Diagnosis
The first steps in diagnosing a P3009 are to clear the code with the scanner, turn the ignition switch to the “ON” position, let the car sit in “PARK” fora minute, then recheck for the P3009. The idea is to divide the circuit– when the car is in park there is no power leaving the battery pack in the rear and going to the inverter in the front, so if the code resets,the leak is somewhere in the battery pack. If the code does not reset,the problem is somewhere in the cables, inverter, or transmission (or is intermittent).
Since the code didn’t reset with the transmission in park, our next move was to disconnect the two high voltage cables from the rear of the car at the battery pack,and at the front of the car at the inverter, then check for cable insulation leaks with a megger.

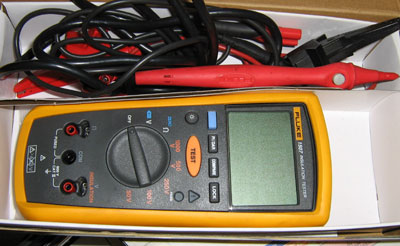
The Megger
A megger, also called a megohm meter, is a tool used for checking insulation on motor windings or high voltage cables. It’s like a regular ohmmeter, except it uses a higher voltage. I checked the output of our megger out of curiosity, and found that in the 500V range, it puts out 529V at 1.74 mA (about 9 watts). My Fluke 88 ohmmeter puts out 2.3V at .29 mA (about .01 watts). I’m not sure if you can zap yourself with a megger, or whether that zap might be painful or even be dangerous. I’m too much of a chicken to find out, so I keep my hands away from the probe tips just to be safe.
A megger can be used to test the resistance of each winding of a 3 phase motor. If there are no shorted windings, each winding ought to have similar resistance. Before hybrid cars, meggers were most often used to test large electric motors on pumps, trains, boats, etc.. Our mechanic Enzo says the old megger he used while working as a tug boat mechanic had a hand crank to generate it’s test current.
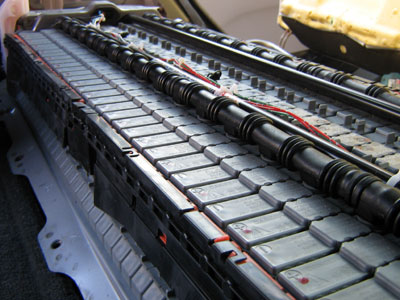
What if the P3009 had set in park?
By the way, if the P3009 *had* reset while sitting in PARK with the key on, the next step would have been to remove the battery cover to check for shorts to the cover, etc. We pulled this one off (on a different car) because we had a codes P3030 (high voltage line snapped) and P3001(HV battery ECU malfunction), but that’s another story.
Testing the Motor/Generators
Once we confirmed the HV leak was not under the battery cover (with the key on test), and that the HV cables from the battery pack to the inverter had good insulation (with the megger), we then start to check MG1 (Motor/Generator 1) and MG2 (Motor/Generator 2) with the megger. MG1 & MG2 are 3 phase motors, and therefore have 3 cables each. The cables come from the inverter, and must be disconnected from the inverter before testing the motor windings and cables with the megger.
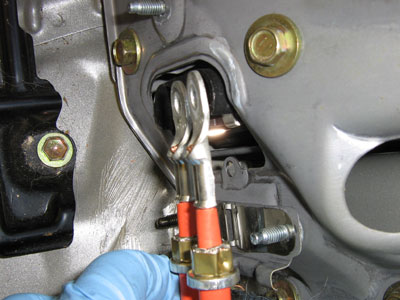
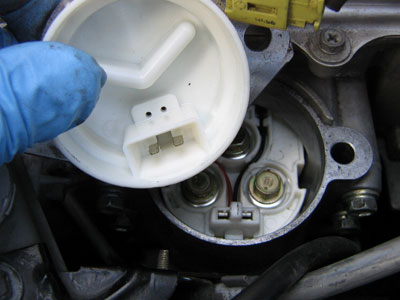
Interlock Jumpers
Notice that there is a small jumper connector on the square MG2 cover and another on the round MG1 cover? The jumper completes a circuit that tells the HV ECU (I think) that the cover is in place. If you were doing something silly, like running the car in gear on a rack, and tried to remove the cover to poke your fingers in there, the power would be shut off and your suicide attempt would be thwarted. This is one of the many interlocks that makes it hard to hurt yourself with a Prius.
You may notice that I’m not wearing lineman’s gloves in this picture. That’s because I’m sure there is no voltage. The linesman’s gloves are only necessary until you’ve shut the power off and tested to make sure it’s off. Once you’ve done that, there’s no reason to worry about the orange cables and cumbersome gloves.
The MG2 is Bad
Anyway, we checked between each of the 6 cables with the transaxle case with the megger and found that all 3 MG2 cables had continuity to ground, meaning there is a short to ground in one of the windings. All 3 of the MG1 cables had the proper resistance, specified in the manual. This was the same on both transaxles we diagnosed; only MG2 was bad.
Why doesn’t a “High Voltage Leak” stop the car dead?
If you’re like me, you may be wondering why a car with a “high voltage leak” is still driving around with no other symptoms other than the warning triangle. Shouldn’t there be smoke, fire, melted cables or at least a few blown fuses? The Prius relies solely on MG2 for motive force in reverse. If MG2 were shorted, wouldn’t there be no reverse? Yet all three Priuses with P3009s drove, and backed up, just fine.
High voltage systems aren’t chassis grounded
Auto mechanics are accustomed to thinking of electrical systems as grounded to the chassis. A typical circuit would start at the battery, go through a main fuse, through the ignition switch, through a circuit fuse, to the component being powered (the radio for instance), and then to the body of the car where the power would travel through the metal in the body to the negative battery cable and back into the battery. So when we think of a high voltage leak, we think of high voltage shorting to ground (the body) before the load, which would cause bad stuff to happen if there were no fuse in the circuit.
However, the Prius three phase motor is not grounded to the body. The power does not flow from the inverter, through a winding, through the transmission case and body back to the inverter. Instead power pulsed between two windings in sequence. For instance, winding 1 & 2 might be energized first, then 2 &3, then 3 &1, the 1 & 2 again and so on, pushing the permanent magnet in the motor around and around, making the motor spin. Power is applied to one winding and grounded through another, not through the body of the car.
The HV battery, cables, inverter, and transaxle do not push any high voltage through the body of the car; they are completely isolated. So if there is a high voltage leak to the chassis, it does not complete a circuit, but can be detected by the computer, and set a code P3009. This would mean than a voltmeter with one lead touching one of 3 phase cables and the other touching the transmission case, should read 0V, provided everything is working normally. I’ll be testing this theory next time I have an opportunity.
The Replacement
Our tech Scott has done a lot of major 1st gen Prius repairs, more than anyone else here. He’s not afraid of any project and is always smiling, even when the going gets rough. Luckily, the going was not rough on either of the Prius transmission replacements, and Scott made the jobs look easy. Every mechanic has their own specialties, Sandor is the Subaru engine master, Brad is the emissions & drivablity guy, and so on. We try to make sure everyone does some of each type of work, so our shop will still run when if someone goes on vacation. However, it’s hard not to assign a job to a mechanic that has already memorized the location of every nut and bolt he’ll need to turn. Scott is rapidly becoming our “Prius guy”, making him a hot commodity around here.
![]()
We’re happy to work on hybrids
We get a lot of Hybrid referrals from competing shops who want nothing to do with hybrids, and we’re very happy to take them. We do our best to treat another shop’s referral like we’d want another shop to treat our referral. However, my feelings about the auto repair industry’s lack of enthusiasm for hybrids are a little conflicted. On the one hand, I’d like all shops to embrace hybrids, because I think many customers will follow their mechanic’s advice when it comes time to buy a new car. On the other hand, I would happy to be the only independent hybrid shop in town. Here in Berkeley, that would be a pretty lucrative monopoly. Oh well. It’s not up to me, so I won’t worry about it. Back to the transaxle.
Remove the engine and transmission together
The engine must be removed to remove the transaxle, but it’s not much harder than removing the engine on the average car. Like many modern front wheel drive cars, the engine and transmission come out the bottom of the car. We use carts with blocks of wood to support the engine and transmission, then, once everything is unbolted and disconnected, we raise the car on the lift, leaving the engine and transmission sitting on the cart. There are all sorts fancy drive train jacks available, but we’ve found the two cart method works the best for us.
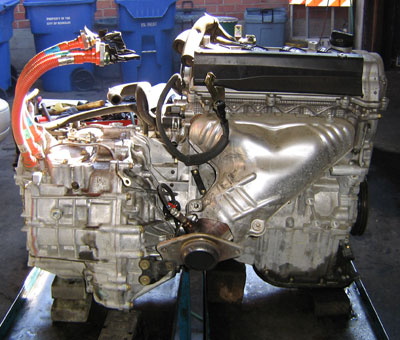
Now we split the engine and transmission, which is pretty easy to do since there is no torque converter or clutch on the Prius.
Damper
There is a sort of clutch-like damper assembly between the engine and transaxle, but it only provides a little damping, no actual clutch like action.
![]()
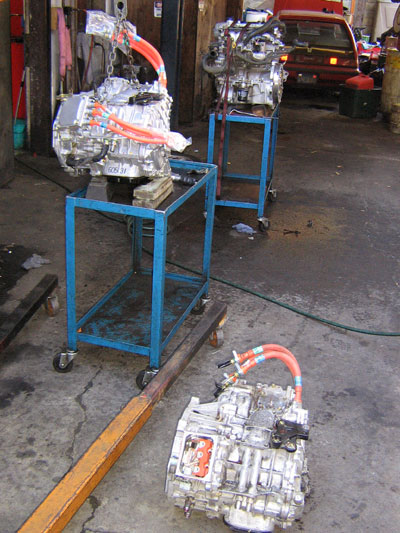
New Transaxle
Unfortunately, there is not currently a Toyota HV transaxle remanufacturing program. Brand new was the only option our dealer mentioned when we called. This new transaxle was $3716. We’ve since found out that it is possible to purchase MG2 as a separate part, but we have not yet researched whether it would be cost effective to replace only MG2. I’ve been meaning to tear down one of the old transaxles to check for wear on parts other than MG2 and to figure out how much time it will take for the repair. Maybe even complete the rebuild and stock it for the next time. However, we’re always so busy, I haven’t ended up with time enough to spare for a project.
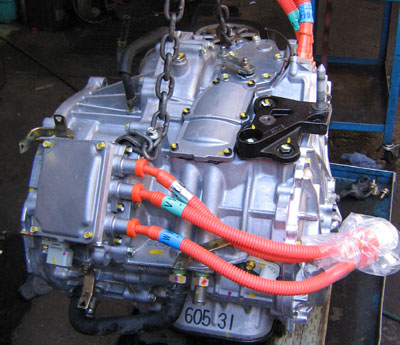
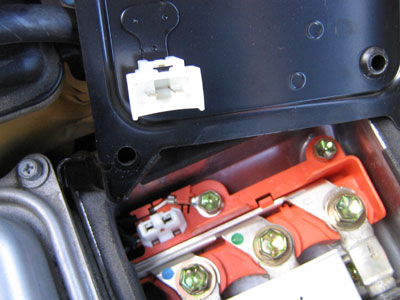
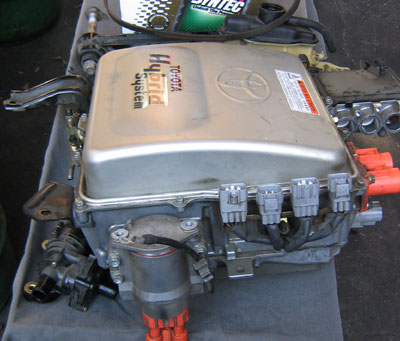
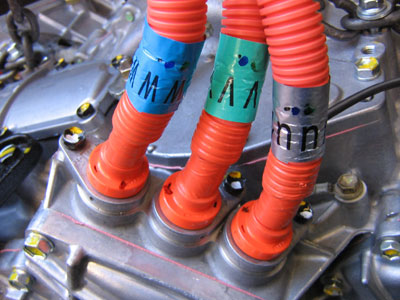
The 6 HV cables from the inverter to the transaxle are pre-labled so you are less likely to install them wrong. There are matching U, V, & W marks on the inverter. The cables will reach to the wrong ports, but they won’t look right. The HV cables are no harder to deal with than spark plugs wires were, but I’m sure most shops have had a car towed in with a “car won’t start after tune up” complaint, and found the plug wires all switched around.
Both Prius transaxles were fairly easy projects (easy for me to say since Scott was doing all the work). We’d be happy to do this project again.