
DTC P04EE: 0.02 inch Leak (Tank Leak)
P04EE can be confusing because Honda’s EVAP system is more complicated than the older systems many technicians are familiar with. It has two pressure sensors, an electric vacuum pump, a changeover valve inside the leak-check module, and a fuel vapor containment valve that allows the PCM to test different parts of the system separately.
The good news is that P04EE itself is fairly logical once you understand what the PCM has already tested.
This article focuses only on the parts of the EVAP system that are necessary to understand and diagnose P04EE. It is not intended to be a complete explanation of Honda’s EVAP system. Components, operating modes, and diagnostic functions that do not affect P04EE are intentionally omitted. The diagrams are also simplified functional diagrams rather than reproductions of Honda’s service-manual schematics.
Vehicle Application
This article is written primarily around the 2019–2022 Honda Insight KA/KC EVAP system.
The 2018–2021 Honda Clarity Plug-In Hybrid uses materially the same P04EE monitor strategy, including separate tank-side and canister-side leak testing.
Other Honda and Acura vehicles use similar EVAP leak-check hardware, but don’t assume that the ECM monitor is the same for your car. It may not be. Check the model-specific “Advanced Diagnostics” information in Service Express to verify.
The Simplified System
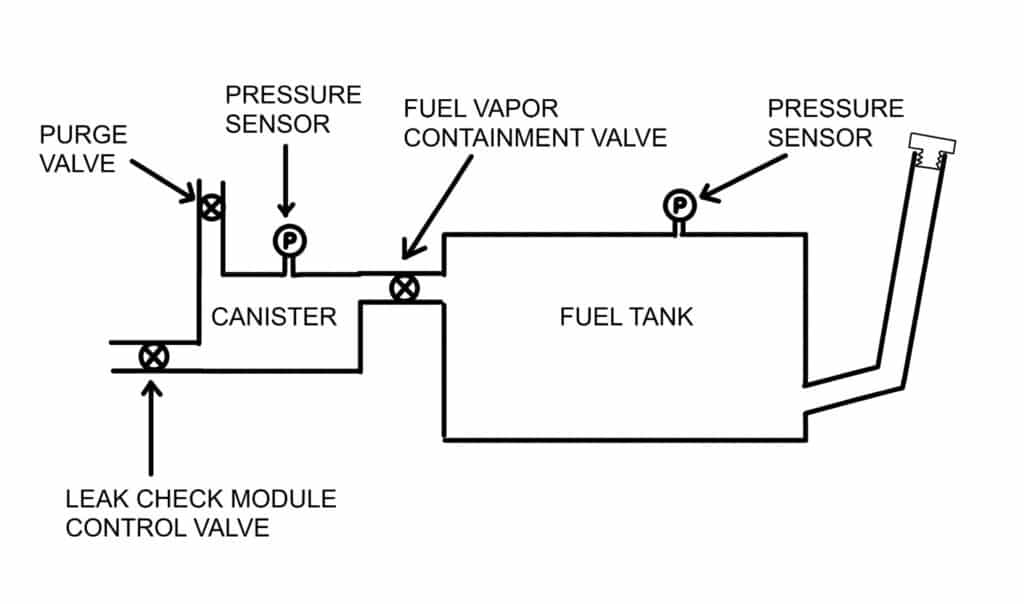
For P04EE diagnosis, think of the EVAP system as two sections separated by the fuel vapor containment valve.
On the canister side are:
- EVAP canister
- Purge valve
- EVAP leak-check module
- Vacuum pump
- Leak-check pressure sensor
- Canister changeover valve
On the tank side are:
- Fuel tank
- FTP sensor
- Filler neck
- Fuel cap
- Tank-side vapor hoses, fittings, seals, and openings
The fuel vapor containment valve connects the two sections when open and isolates the fuel tank when closed.
The wiring diagram confirms that the FTP sensor is a separate tank-pressure sensor, while the EVAP leak-check module is a separate electrical assembly controlled and monitored by the PCM.
Honda’s system description shows that the leak-check module contains a small vacuum pump, pressure sensor, and canister changeover valve.
A note about Honda terminology
Honda uses more than one name for the valve inside the leak-check module.
The System Description calls it the Canister Changeover Valve. The P04EE Advanced Diagnostics information calls it the Control Valve in the EVAP Leak Check Module. They refer to the same component. In keeping with Honda’s protocol of confusing people, I’ve labeled this valve as the Leak Check Control Valve in the diagram and I’m calling it the changeover valve in the text. Sorry. I’m not good at image editing or typing.
Honda states that the changeover valve is normally open when de-energized. In that condition, the EVAP canister is open to atmosphere. When the PCM energizes the valve, it closes the atmospheric path and seals the canister side of the system. You can think of the changeover valve as a “canister closed valve”, but with the ability to route pump flow in addition to sealing the canister from atmosphere for testing.
THREE Pressure Sensors
There are three pressure sensors involved with EVAP self-testing
- The FTP sensor measures pressure inside the fuel tank.
- The leak-check pressure sensor is inside the EVAP leak-check module and measures pressure on the canister side of the system.
- The PCM also has a barometric pressure (BARO) input, which represents atmospheric pressure.
The leak-check pressure sensor is the primary sensor used by the vacuum-pump leak test. It allows the PCM to compare the pressure the pump can produce in the EVAP system and compare it against the pressure the pump can produce when connected to a chamber with a 0.020″ reference orifice, which represents the maximum allowable EVAP system leakage.
When Does the Test Run?
Honda starts the EVAP leak test after the vehicle has been turned OFF for at least five hours. If the test is refusing to run, check engine coolant temperature, barometric pressure, and battery voltage. If any of these is out of range, the test won’t run.
Honda divides the monitor sections. For the P04EE test, only three phases of one section are used.
Phase 1 — Is Tank Pressure Different From Atmospheric Pressure?
Before the vacuum pump performs an active leak test, the PCM first checks whether the fuel tank pressure is different than atmospheric pressure. If the tank is sealed, it probably should be. If this part of the test passes, the P04EE section of the monitor completes and testing is done.
Before this part of the test, the canister changeover valve is normally open, so the canister side of the system is exposed to atmosphere.
The PCM then:
- Closes the canister changeover valve, sealing the canister side from atmosphere.
- Opens the fuel vapor containment valve, connecting the fuel tank to the canister.
- Watches the change in pressure at the leak-check pressure sensor.
Honda calls this pressure change ΔP (delta pressure, or change in pressure)
The canister started at approximately atmospheric pressure. When the containment valve opens, any pressure or vacuum stored in the fuel tank is communicated to the canister side. The leak-check pressure sensor detects the resulting change.
Why does this tell the PCM anything about leakage?
A sealed fuel tank will often develop pressure or vacuum while sitting.
Fuel temperature changes. Ambient temperature changes. Fuel evaporates and condenses. These processes can cause tank pressure to move above or below atmospheric pressure.
If the tank still has a significant pressure difference after the long soak, it has demonstrated that it can retain pressure.
Honda therefore considers the tank side normal for this portion of the monitor if the pressure difference is sufficiently large.
If tank pressure is near atmospheric pressure, the result is inconclusive and the ECM continues with the remainder of the test.
If the tank pressure is nearly equal to atmospheric pressure, the PCM doesn’t know whether:
- the tank is sealed but happened to end up near atmospheric pressure, or
- the tank has a leak and slowly equalized with atmosphere.
Near-atmospheric tank pressure therefore does not set P04EE.
Instead, it causes the ECM to proceed to an active leak test.
Phase 2 — Test the Entire EVAP System
Because the passive tank-pressure check was inconclusive, the PCM now actively tests the system.
The fuel vapor containment valve is open, so the canister and fuel tank are connected.
The canister changeover valve closes the system from atmosphere, and the vacuum pump in the EVAP leak-check module lowers pressure in the combined system.
The pump is now testing both the canister side and the fuel tank side. In other words, it’s testing the entire system.
Depending on the altitude, pump efficiency, and possibly other factors, the ECM needs to know what a 0.020″ leak would look like on this car in this place. To figure this out, the pump evacuates a chamber that’s monitored by the “leak check pressure sensor” on the canister side of the system. This chamber has a calibrated reference orifice which is basically a leak to atmosphere. The ECM stores the sensor’s response in the leaking chamber. It collects this data and compares it to how the system performs during the actual test. The system must leak less than the calibration test because a 0.020″ leak is the maximum allowed.
If the pump can’t reduce system pressure sufficiently, the complete system fails the leak test. The ECM knows the system leaks but doesn’t know where the leak is, so the next step is to remove the tank from the test and try again.
Phase 3 — Test Only the Canister Side
The PCM now closes the fuel vapor containment valve, which separates the fuel tank from the canister.
The leak-check module again seals the system from atmosphere with the canister changeover valve and operates the vacuum pump. This time the pump is evacuating only the canister side because the fuel vapor containment valve is closed.
If the canister side also fails, then the PCM has evidence of a leak on the canister side. That diagnostic path is associated with P04EF.
But suppose the canister side passes.
The PCM now knows:
Whole system connected = FAIL
Tank isolated = canister side PASS
There is only one major difference between those two tests:
The fuel-tank side was included in the failed test and excluded from the successful test.
The logical conclusion is therefore:
The excessive leakage is on the tank side of the system.
This is what sets a P04EE. Three tests.
- Is the tank pressure different from atmospheric pressure? No? Next test.
- Does the whole system hold vacuum created by the pump? No? Next test
- Can the canister side of the system hold vacuum created by the pump? Yes? Then the tank side must be leaking.
A passing canister-side test provides strong evidence that the following can seal well enough for the monitor to pass:
- EVAP canister
- Canister-side vapor plumbing
- Purge valve
- Leak-check-module atmospheric sealing path
- Canister changeover valve
- Vacuum pump and leak-check module
- Leak-check pressure sensor and reference system
For example, if the purge valve leaked badly enough to prevent the pump from pulling the required vacuum, the isolated canister-side test should also fail.
The same logic applies to a canister changeover valve that cannot seal the canister from atmosphere.
This is why replacing a “canister close valve” based only on P04EE does not fit the monitor logic very well.
What About the Fuel Vapor Containment Valve?
During the canister-only test, the containment valve is supposed to isolate the tank from the canister. A leak through the closed valve would connect the canister side to the tank side. At this point in the testing we know there’s a leak somewhere, because the whole system couldn’t hold pressure during phase 2. If the containment valve is leaking, the vacuum test of the canister side would fail too, right?
Despite this, Honda lists a leaking vapor containment valve as a possible cause of a P04EE. I don’t understand why. I suspect it’s just an error in the service info. I’ve seen other errors, so it’s certainly not out of the question.
Here’s an additional reason to doubt that a containment valve could cause a P04EE. Honda has a separate test and trouble code for a leaking containment valve. The ECM monitors the tank pressure sensor while it’s vacuum testing the canister side of the system with the containment valve is closed. If the tank pressure drops, a P2450 will set.
So, should you suspect a faulty containment valve with a P04EE? Probably not, but since service information lists it as a possibility, don’t rule it out completely. One possible explanation for its inclusion is that Honda is not considering a valve failure, but a crack or other leak in the tank side of the valve.
Where Should Diagnosis Start?
The P04EE monitor has already pointed us toward the fuel-tank side. This is what you should test. Ignore the canister side and all three of the valves and focus on finding the tank side leak.
Possible leak locations include:
- Fuel cap seal
- Filler-neck sealing surface
- Filler pipe
- Fuel tank
- Fuel pump or fuel-tank-unit seal
- FTP sensor seal
- Vapor hoses and molded vapor tubes
- Quick-connect fittings and their O-rings
- Tank-side connections at the fuel vapor containment valve
- Fuel vapor containment valve assembly
Honda’s troubleshooting procedure begins by inspecting the fuel cap and sealing surface and this is a good idea. A lot of EVAP diagnosis begins with, “I think it might be the cap; let’s try that first.”
One the one hand, it often leads to repeat visits, and there’s a danger your customer might think you’re incompetent. On the other hand, nobody wants to pay for an hour or more of labor to be told they needed a gas cap.
It later instructs the technician to disconnect the fuel vapor hose from the fuel vapor containment valve and apply vacuum to the hose leading toward the tank. That is an excellent isolation point.
How to Pressure Test or Smoke Test the Tank in Isolation
With the tank-side hose disconnected from the containment valve, a suitable adapter can connect directly to the tank side of the system.
From this point the technician can perform:
- Vacuum-hold testing
- Low-pressure testing
- Smoke testing
Honda specifies approximately 2 kPa (0.6 inHg / 15 mmHg) of vacuum for its vacuum-hold test and cautions against exceeding that amount because of the FTP sensor.
Honda recommends a conventional handheld vacuum pump for this test, but it’s the wrong too for this job. It can create WAY too much vacuum and cause damage and the gauge is incapable of accurately measuring 1/2 an inch of mercury.
Using a smoke/pressure tester or a low vacuum tester is a much better (and safer) way to test for leaks.


The factory hose is often a rigid or corrugated molded vapor line with an O-ring quick connector rather than a conventional rubber hose. Forcing a generic smoke-machine cone or hose barb into the line is therefore not ideal.
A better approach is an adapter that duplicates the mating nipple on the fuel vapor containment valve. The vehicle’s original quick connector and O-ring can then seal to the test adapter exactly as they seal to the valve.
This also avoids damaging the vapor hose and provides a repeatable connection for vacuum, low pressure, or smoke.
Interpreting the Tank-Side Test
If the isolated tank side does not hold vacuum, do not assume that the vapor hose itself is defective as the Honda service information suggests. The test connection communicates with the complete tank-side vapor volume. A failed vacuum-hold test only proves that there is leakage somewhere downstream of the test connection.
The leak could be:
- the hose,
- a fitting,
- an O-ring,
- the FTP sensor seal,
- the fuel tank unit seal,
- the filler system,
- the fuel cap,
- the tank itself,
- or another tank-side opening.
Smoke testing the isolated tank side is often the fastest way to locate the actual leak once the failed pressure or vacuum test has confirmed that leakage exists.
P04EE in One Sentence
If you remember only one thing from this article, remember this:
P04EE means the complete EVAP system failed the leak test, but the canister side passed when the fuel tank was isolated. Start looking for a leak on the tank side.