Please note: We do automotive machine work, but only for our mechanical repair customers. We don’t do mail-in repairs at all, and for the most part we don’t do machine work for walk in customers. If you are looking for a local machine shop (and there aren’t many left these days), try one of these:
Hasselgren Racing — This one of the best automotive machine shops in the world, but probably not the best spot for inexpensive machine work for your daily driver.
Wise Auto Tech — I’ve never met these guys or seen their shop, but they’re one of the last automotive machine shops standing, and they do machine work for walk-in customers.
Why weld instead of replacing?
Why weld? The main reason to weld instead of replacing is cost. Bare cylinder head castings range from $560 for popular heads like the 22RE, to $1500 and over for many of the 16 valve heads.
Prepping and welding a head with average damage usually takes me about 3 hours. If a head can be repaired for less than the cost of a new bare head or a used “core” head, then it’s an attractive option. We like the idea of recycling a part rather than buying a new one and we also like repairing cars rather than simply bolting on new parts all day.
If we can do both and save our customer money, everyone wins. There are times when a head should not be welded. Heads with advanced cooling system corrosion, excessively large or numerous cracks, too many past rebuilds, or too many other rebuilding hurdles are better sent to the metal recycling bin.
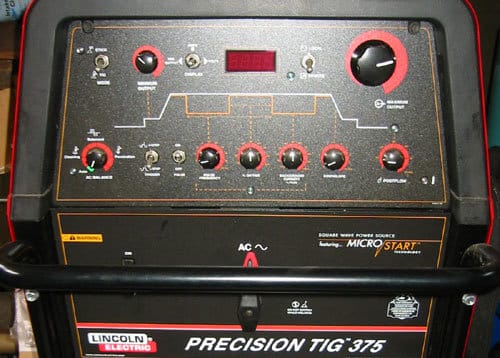
Lincoln Precisin Tig 375
If you’ve read my, “How to Weld Aluminum” article, you will notice our equipment has improved quite a bit. Art has always made sure his mechanics have whatever equipment they request. Our bottom-of-the-line air cooled TIG has been replaced with the top-of-the-line Lincoln water cooled welder with 420 Amps of output.
Thick aluminum (like cylinder heads) requires a powerful welder. Some sources say “at least 275 amps” is needed to weld cylinder heads, but I’m not sure this would be sufficient. My experience is that 350 amps is a good “max” setting, even when the cylinder head is preheated before welding. This way there is a little “extra” as the end of the pedal.
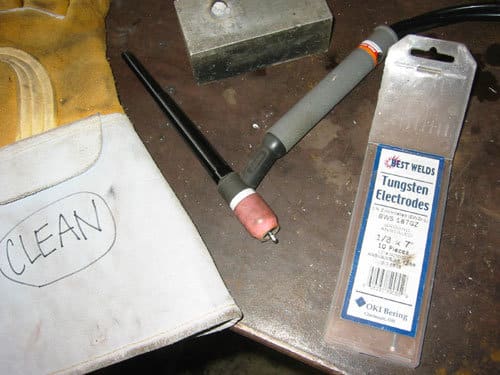
1/8″ Tungsten
I use 1/8″ Zirconated tungsten for cylinder heads. I’ve read articles by more experienced welder, suggesting 3/32″ are adequate with preheating, but I’ve had problems the smaller tungsten with melting and spitting, so I use the 1/8″.
The arc has been easy to start and stable for me. I ball the ends of several tungsten on an aluminum block before I begin welding to save time if I foul one.
Fouling the tungsten should be avoided though; grinding out contamination on a hot head in like trying to shape used chewing gum with a die grinder. I have a second set of clean welding gloves I use only for cylinder heads and other important aluminum projects to prevent oil from the glove getting onto the filler rod and into the weld.
Make a plan
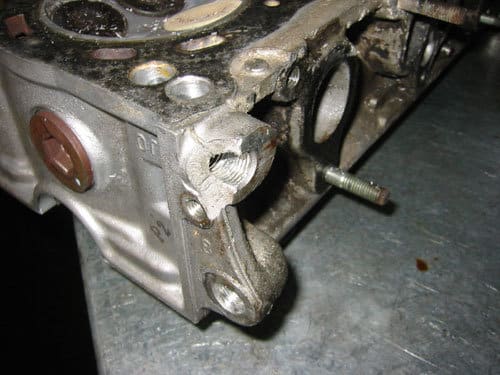
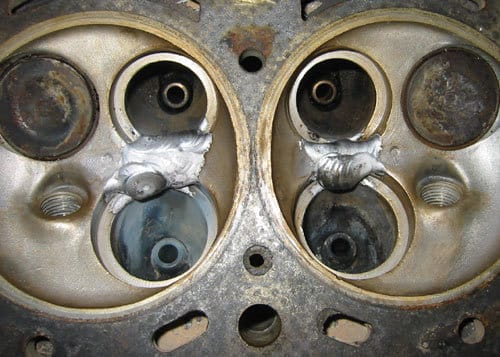
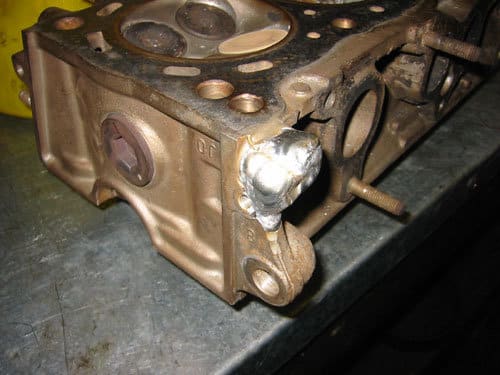
The first step is to plan what you’re going to do. This head has a broken lug for the power steering pump and two cracks between the valve seats on #2 and #3. When I need to weld in a difficult to reach area, I set up the torch, nozzle and tungsten extension I plan to use and do a dry run to make sure I’ll be able to reach all of areas I need to while maintaining the optimal tungsten and filler rod angles. Once the head is hot, it’s best to be ready to weld, not frantically changing nozzles and back caps.
Next, I grind the areas I plan to weld. Aluminum has an invisible oxide surface layer that melts at three times the temperature of aluminum. It is impossible to weld aluminum without removing the oxide coating.
Using a wide fluted carbide bit on a die grinder is a great way to be sure the aluminum oxide layer is removed. A little WD40 sprayed on the bit will help keep the aluminum from sticking to the bit. Just be sure to remove it with some acetone before welding, especially if you’re not going to preheat. It’s a good idea to clean beyond the area you plan to weld grease and dirt in the surrounding areas will liquefy while you are welding and will flow into your weld pool. If there is a crack between the seats, use a 3″ cut off wheel to cut through both of the seats along the crack, then the seats will pop right out with a pick.
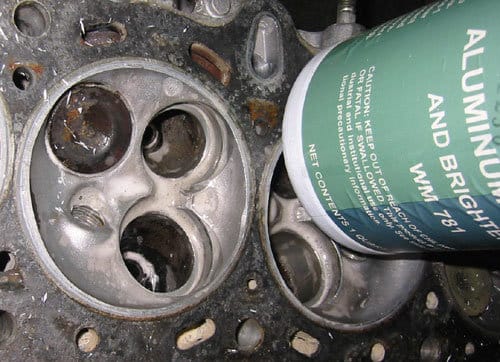
Aluminum cleaner
After I grind, wire brush, and degrease the area to be welded, I apply aluminum cleaner and let it sit for a couple of minutes. Aluminum cleaner is acid and will eat away the surface oxide layer.
This may seem like wearing a belt and suspenders, but I’ve never found myself wishing I’d spent less time cleaning while welding and I frequently find myself wishing I’d spent more. The aluminum cleaner gets into nooks and crannies a wire brush cannot reach. On important welds (like heads), I use the aluminum cleaner on the filler rod as well. I’ve had filler rod that has oxidized and will leave a “sausage casing” hanging from its end when dipped into the pool.
Pretty isn’t important
A pretty bead with neatly stacked ripples is not important when welding a cylinder head. Fusion, penetration, lack of porosity, and preventing (or removing) tungsten inclusions are.
There’s no shame in remelting a layer before going on next or cooling the head to grind and start over. It will cost a lot more time if the head fails in service than it will to re-weld. Building up more than necessary does nothing to improve the weld and adds to the time it will take to machine away the excess. That being said, better a little too much than a little too little. If there is a low spot, you’ll have to heat the head up and weld some more.
Cool down
After I’m done welding, I put the head back in the oven for 15 minutes, then turn the oven off and let the head cool. I’ve read that a post heat helps to reduce the stress in the cylinder head that could lead to distortion problems while machining the counterbore or future cracking in service.
I’ve read some opinions that heating the cylinder will cause annealing, but I do not believe significant annealing will occur using this procedure. I have not been able to find an annealing procedure for 356 cast alloy (which is my best guess as to what most cylinder heads are made of), but I have found annealing procedures for several other types of aluminum, and they generally require heating to around 775 deg F for 3 hours then cooling at 50 deg F per hour. That’s much higher heat and a much longer time than the 30 min preheat and 15 min post heat I’m using.
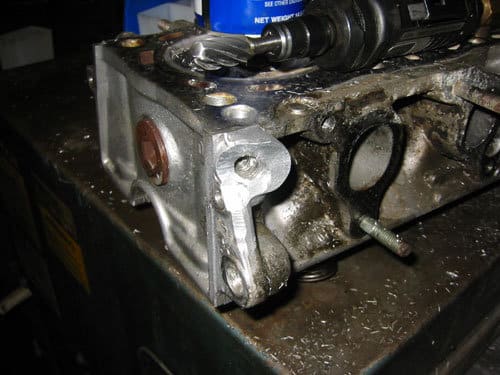
Once the head is cool, the weld can be filed and ground into the desired shape. The counter bores can be cut. New seats installed and ground.
Summary of cylinder head welding repair
- Plan how you’ll do your weld – where the torch will fit, etc.
- Grind out the crack or damaged area to expose fresh aluminum.
- Clean with stainless steel brush and acetone.
- Clean area to be welded and the filler rod with acid, then rinse with water. (Make sure the rod is very dry or porosity will result. The oven will dry the head)
- Heat head in oven to 450-500 deg. F.
- Weld.
- Allow to cool in the oven.
- Reshape / machine / drill / tap
- Pressure test.