In this article we’ll fix a control unit on a Prius hybrid that wasn’t intended to be repaired. This type of electronic repair can save our customers a lot of money and make repairs possible when parts are discontinued. Who should read this? Ideally potential customers who want to see what we can do, but it may also be useful to other mechanics working on Toyota hybrids, or even some DIYers.
Table of contents
- Why read this?
- How Toyota hybrid battery packs are monitored
- What does a P0B3D-P0B83 code mean?
- What causes P0B3D-P0B83
- How to diagnose P0B3D-P0B83
- Will the trouble tree / flow chart come to the right conclusion?
- What’s the root cause of this failure?
- Repairing the 2010-2015 Prius battery smart unit (AKA hybrid battery voltage sensor)
- Final Thoughts
- Did you like this article? You may enjoy these as well
Why read this?
2010-2015 (Gen3) Prius P0B3D – P0B83
If you have a 2010 – 2015 Toyota Prius with a “check hybrid system” message and you’ve found a trouble code P0B3D, P0B42, P0B47, P0B4C, P0B51, P0B56, P0B5B, P0B60, P0B65, P0B6A, P0B6F, P0B74, P0B79, P0B7E, P0B83 or P301B, you’ve found the page you need. In this article I’ll discuss what causes these codes, some of the possible pitfalls while diagnosing these codes, and options for correcting the problems that can cause these codes. Let’s get started.
How Toyota hybrid battery packs are monitored
Let’s start with little background. Toyota battery packs are made up of a group of batteries wired together in series. Currently, most Toyota batteries have six cells, also wired in series. Each NiMH cell has a nominal voltage of 1.2 volts. Since there are six cells per battery, each battery has a nominal voltage of 7.2 volts. On the 2010 to 2015 Toyota Prius there are 28 batteries in each pack for a total pack voltage of 201.6V.
The most common battery pack failure is a shorted cell. When a cell is shorted, the pack voltage will drop by 1.2-1.4 volts. If you were a computer monitoring the battery pack health by looking for shorted cells, it would be impossible to tell if there were a shorted cell by looking at the pack voltage because 1.2 volts is only a half of a percent of the total pack voltage. The pack voltage can vary by up to 50 volts as it charges and discharges. Noticing a change of 1.2 volts and determining it’s not part of the normal charging and discharging of the battery would be impossible.
How Toyota uses “blocks” to find bad cells
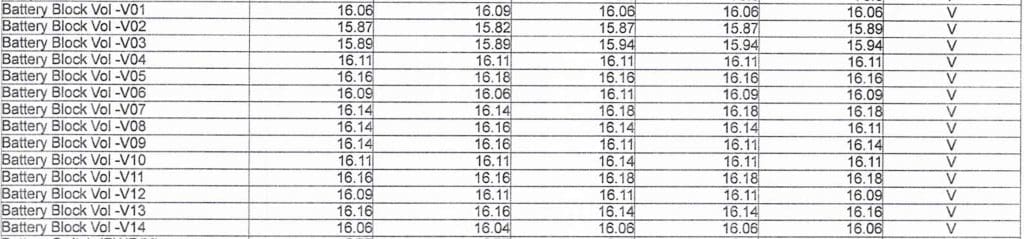
Toyota solves this issue by monitoring the battery voltage in “blocks”. These blocks consist of two 6 cell batteries, and their voltage is between 14.4 and 17V (although block voltage rarely goes above 15.8V because Toyota doesn’t fully charge the battery pack to increase its lifespan).
Since all of the blocks are tied together, and are therefore charged and discharged equally, each of the blocks’ voltage should be the same. This is how the battery control unit can spot a bad cell. If you were a Toyota computer and you saw 15 blocks at 15.2 volts and one block at 13.9V, you’d know that block has a shorted cell.
What does a P0B3D-P0B83 code mean?
So if you have P0B47 does that mean the hybrid battery is bad? No, it doesn’t. (Well, maybe it does, but only indirectly. We’ll get to that later).
P0B3D – P0B83 indicates a problem with the block monitoring circuits or battery control unit, which Toyota calls the battery voltage sensor on this generation of Prius. On the Gen1 and Gen2 Priuses the self diagnostic software was only capable of saying that one of the blocks had a different voltage than the others. It was up to the mechanic diagnosing the car to figure out whether that was a problem with monitoring or an actual problem with the battery block. Starting with the Gen3 Prius, the diagnostic software is able to differentiate between a problem with the battery block voltage and the battery block voltage monitoring system.
A P0B51 indicates an issue with the monitoring circuit “E” for block 5. Actually, I’m not 100% sure about the block 5 part, but it doesn’t matter because the issue isn’t with the block, it’s with the monitoring circuit.
How does the ECU know?
How does the battery control module know that it’s a problem with the monitoring circuit and not the battery block? The same way mechanics used to know back when we had to figure it out ourselves on the Gen 1 and Gen 2 Priuses. If the block voltage is impossible, then it’s a problem with the monitoring, not the block.
If the voltage for one block is 1.4 volts lower than the voltages for the other blocks, then there’s a problem with the block. It might even be possible to have two cells go bad at the same time and have one block be 2.8 volts lower than the other blocks. I’ve never seen it, but it could theoretically happen.
P0B3D-P0B83 sets when the block voltage lower than 2.5V. Could 11 of the 12 cells in a single block fail at the exact same time? It’s pretty unlikely. It’s far more likely that the wire going from the block to the hybrid battery voltage sensor is open. Or that the voltage sensor is faulty.
What causes P0B3D-P0B83
There are really only two possible for a P0B3D-P0B83. Either a failure in the hybrid battery voltage sensor or it’s high voltage harness. A bad high voltage battery cannot cause these trouble codes. However you may need to replace the high voltage battery in order to fix these trouble codes. More on that later. It will make sense in the end, I promise.
How to diagnose P0B3D-P0B83
If you take a look at the service information on Toyota Tech info site, the procedure is pretty simple.
- clear the trouble code
- drive the car and see if the trouble code resets
- if the trouble code resets, replace the Hybrid battery voltage sensor
- drive the car and see if the trouble code resets
- if the trouble code resets again, replace the hybrid battery pack
If you’re familiar with following trouble trees, you’ll know they can get you in trouble pretty quickly. It’s typically much better to learn how the system works and come up with your own diagnostic strategy.
But wait, didn’t I say that they failed Hybrid battery can’t cause this code, at least not directly?
I did. And I was correct. However, Toyota’s not wrong. You may need to replace the Hybrid battery to fix this problem. Not because the battery is bad, but because Toyota does not sell the harness for the battery voltage sensor separately from the battery. Toyota sells this harness for the Gen 1 and Gen 2 Priuses, but they do not sell it for the Gen 3 Prius. If you want this inexpensive harness, you’ll have to buy it with an expensive battery attached to it.
Will the trouble tree / flow chart come to the right conclusion?
As I said, I usually don’t follow trouble trees. In this case I would want to look at the block voltages in the freeze frame data and/or in the live data. But there’s a problem with this: substitute values. What’s the substitute value? A substitute value is when a control unit realizes that a sensor reading is inaccurate and instead of using that inaccurate data to make decisions it ignores it. Actually, it does more than ignore it. It publishes the data it’s substituting for the bad sensor data in the live data and the freeze frame data.
If you’re a mechanic working on a car and looking at data you might think that everything is good because the data is within normal range. What you may not know is that the data is made up in the computer’s mind. Toyota service information, “hints” are given in green text. If you read nothing else in the service information, read the hints, or you’ll be sorry.

So in the case of the P0B3D-P0B83, the Toyota flow chart may actually be the best way to go. You have no access to real data, the only data available is falsified data provided by the hybrid battery control unit. Therefore, we’ll just need to trust the computer’s diagnosis.
What’s the root cause of this failure?
In general, control unit failure is pretty uncommon. There’s a common saying among mechanics, ” It’s never the computer”. Service information flowcharts aren’t the best. The final step is to replace the ECU, but any mechanic can tell you that when you replace the computer after following all the instructions in the flowchart, the car probably won’t be fixed.
In this case, the computer IS the most likely cause of the fault. But there’s a reason for the control unit failing; the battery has been pouring acid into the computer. As it turns out, electronics aren’t very acid resistant.
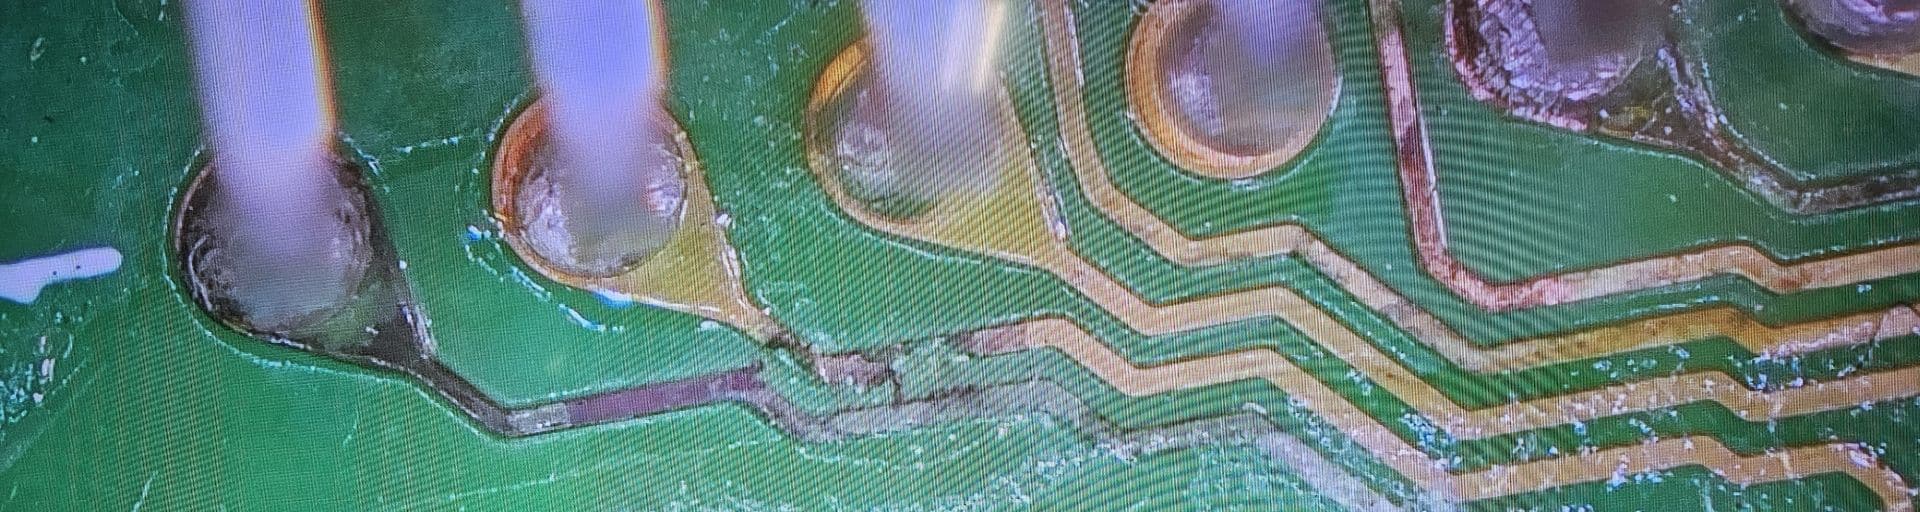
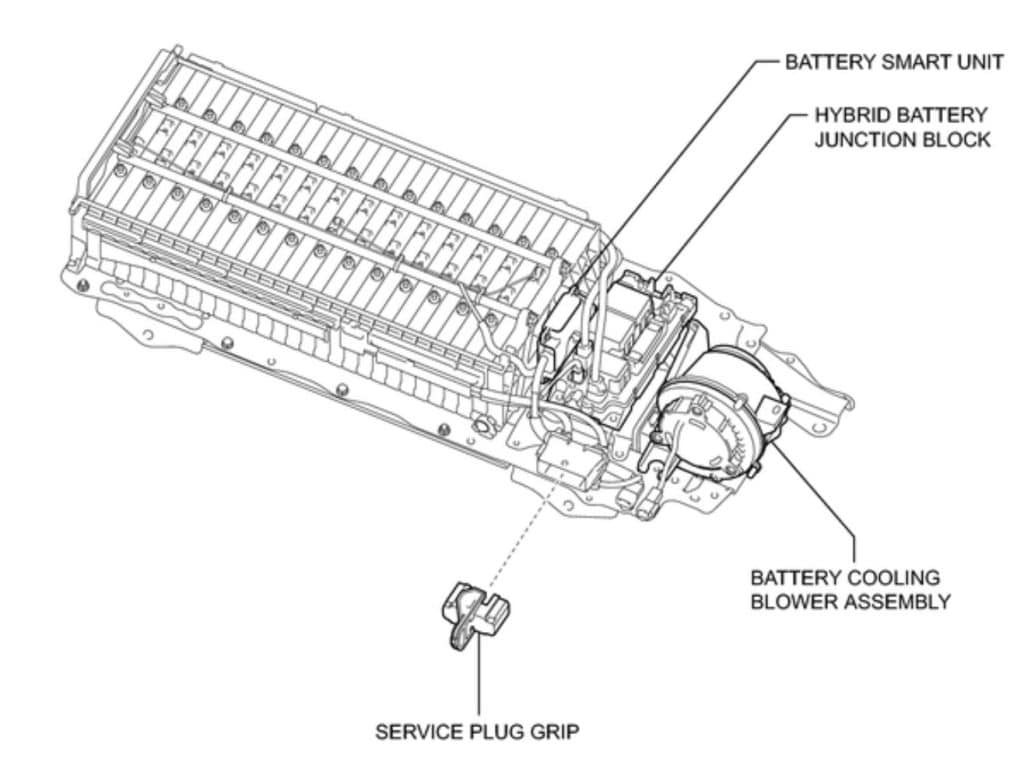
Acid leaks from the terminals of the Hybrid battery. The sense wires lead from the battery terminal to the hybrid battery smart unit. The insulation for the wires acts as a hose for acid to flow from the battery directly into the hybrid battery smart unit. The acid creates heavy oxidation on the terminals in the harness and on the ECU. It also leaks into the ECU and causes damage to the traces and pads on the circuit board.
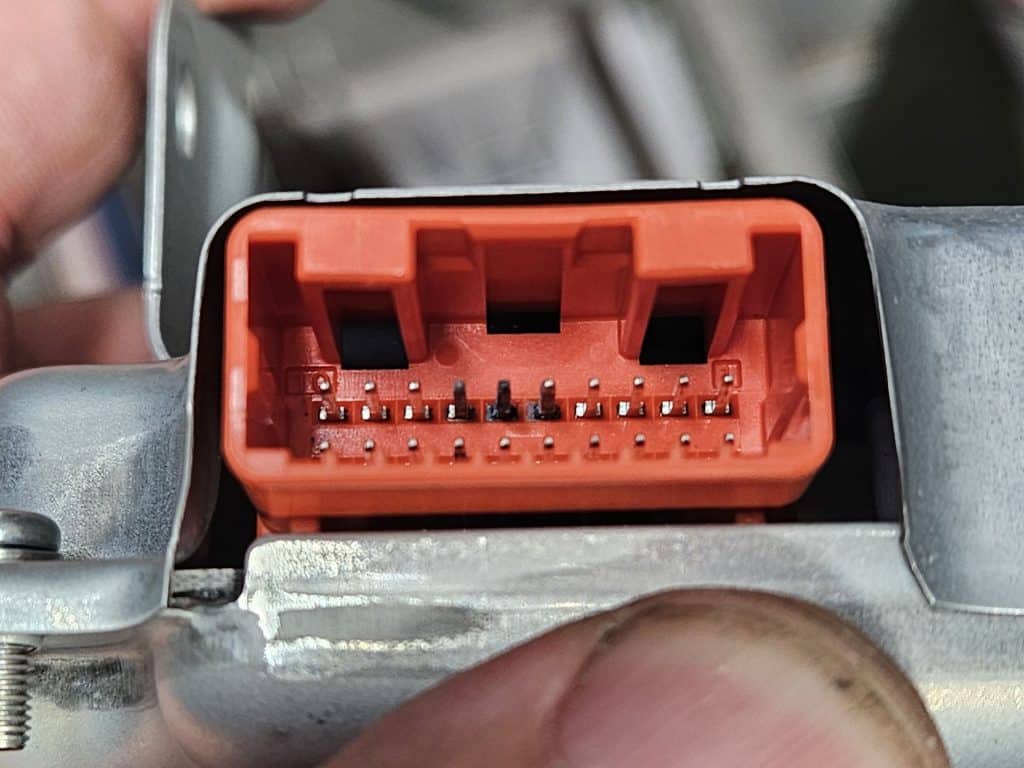
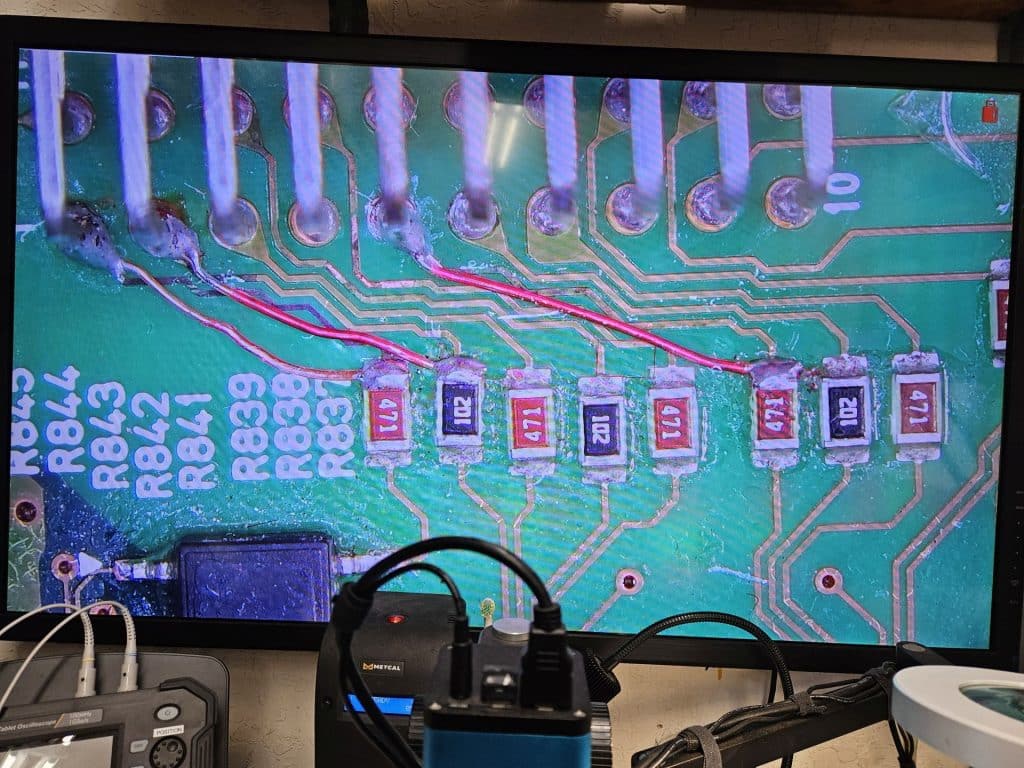
The leaking acid from the hybrid battery has left a thick black oxide coating on some of the terminals for the battery control unit. This coating is non conductive and must be removed before the unit can be returned to service.
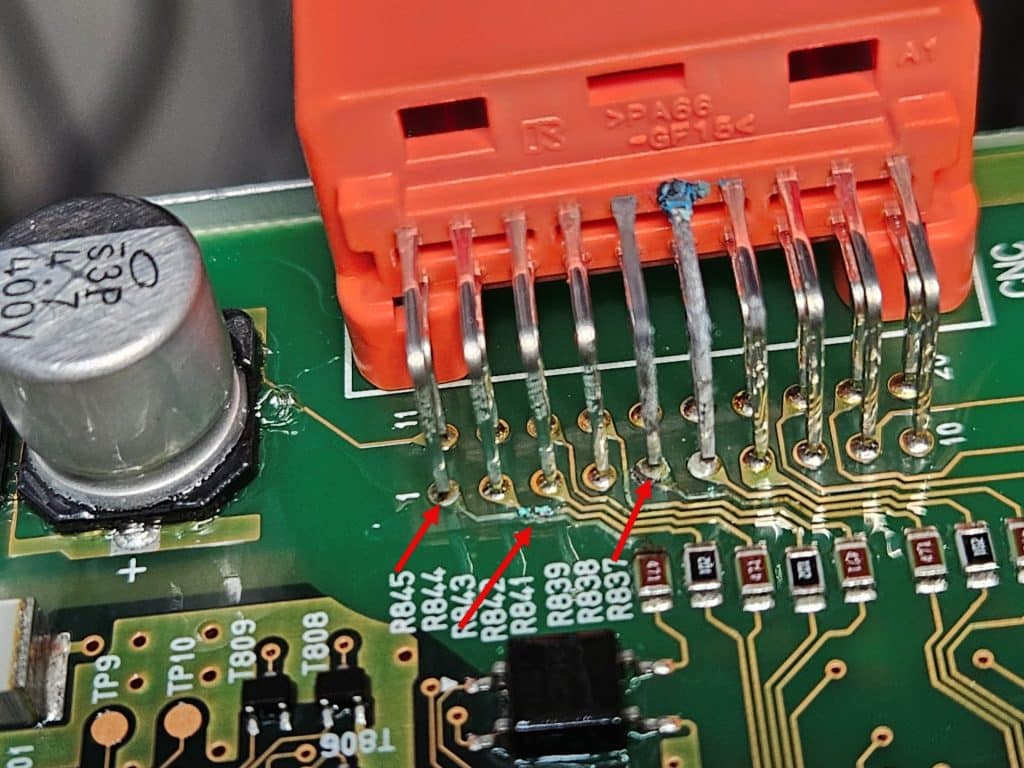
Once the control unit cover has been removed we can see that several of the traces on the circuit board have been eaten away. First I will remove all of the conformal coating and clean the board to remove any remaining acid.
Repairing the 2010-2015 Prius battery smart unit (AKA hybrid battery voltage sensor)
Depending on the severity of the damage, repair may be an option. On the male pins of the ECU can be cleaned using terminal cleaning tweezers with a fine diamond abrasive. The traces on the circuit board can be repaired with jumpers and then sealed with solder mask.
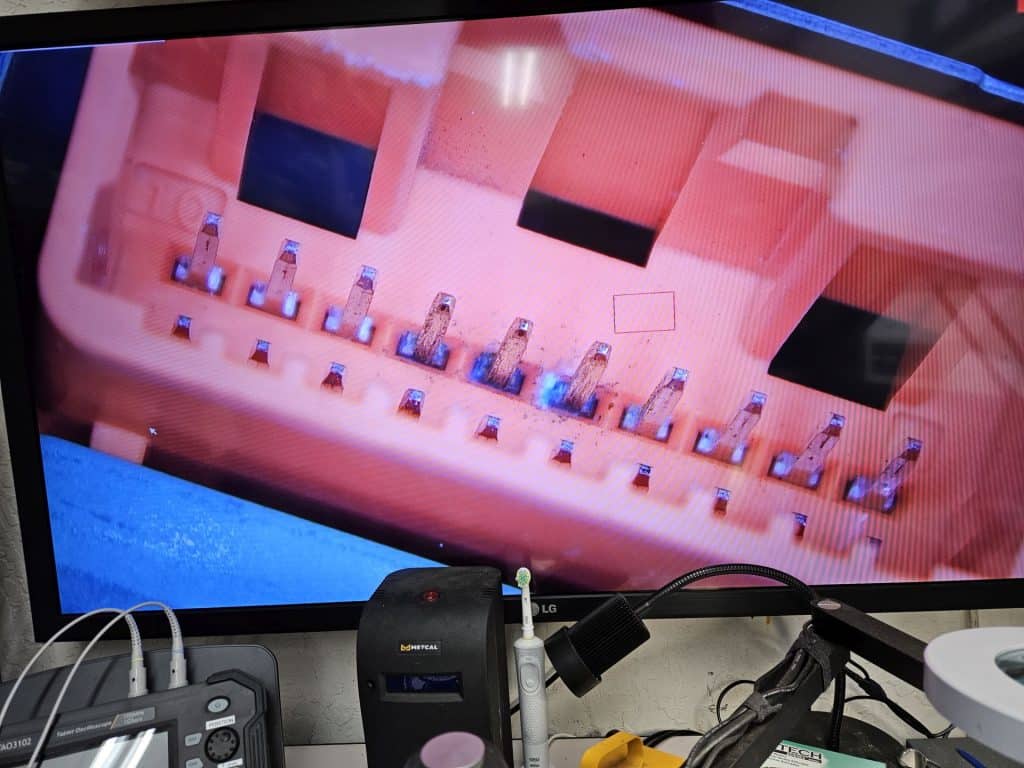
While it looks fairly giant under magnification, these terminals are a tiny. They are about 0.7 mm Square (0.030″). After some careful cleaning all of the terminals are bright and shiny with no oxidation.
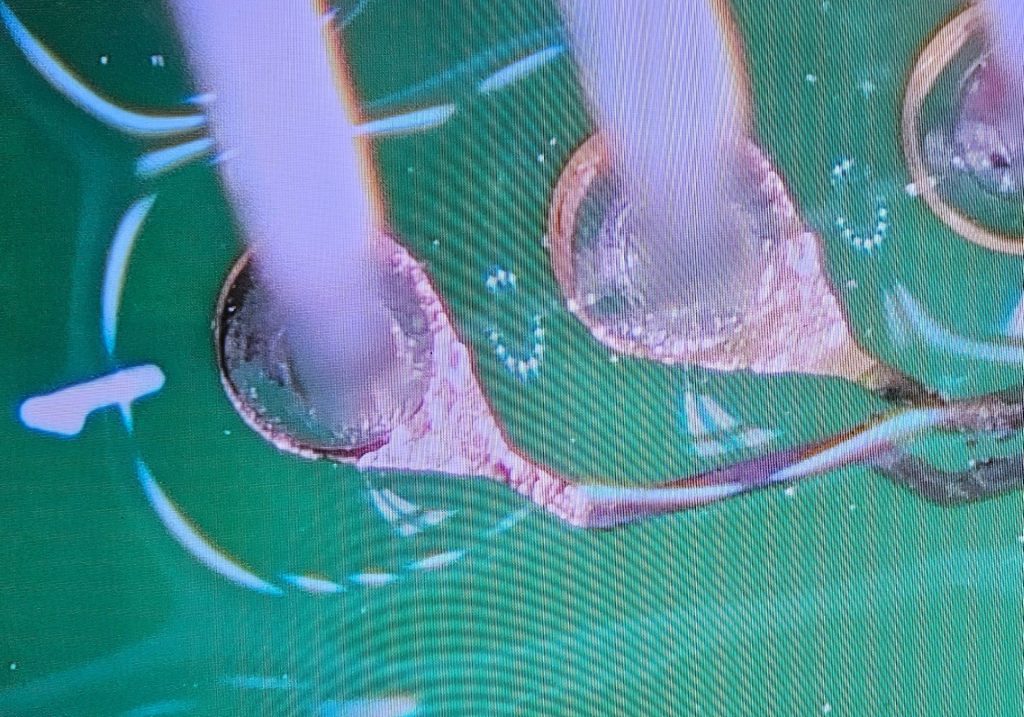
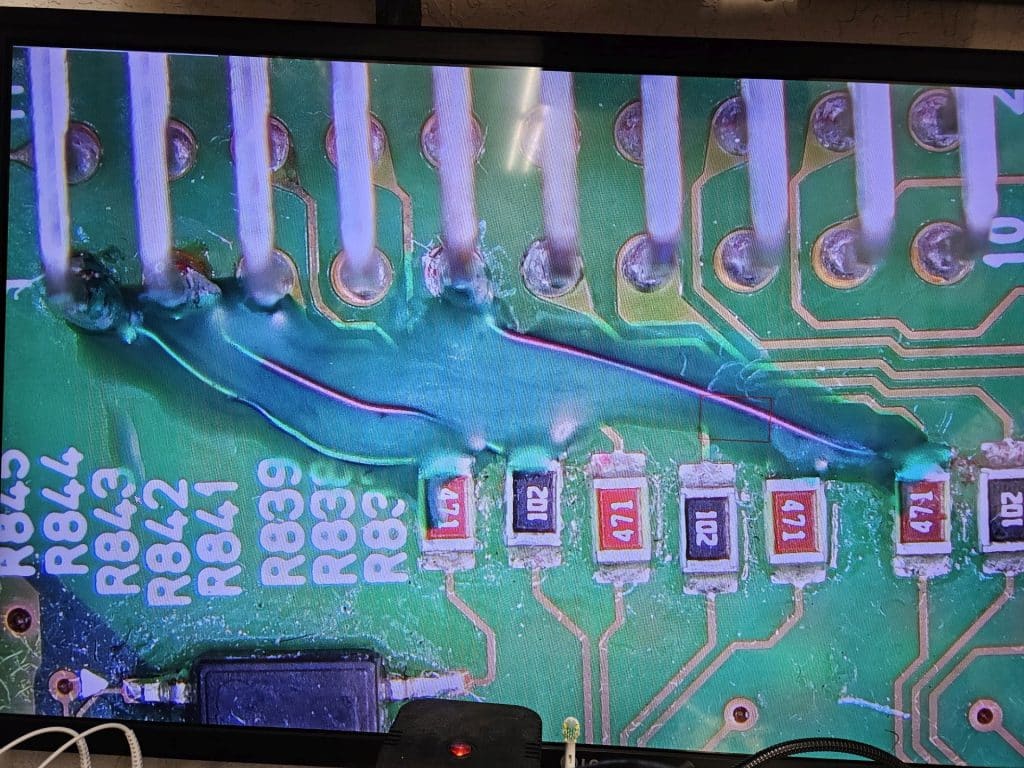
I used a tiny rotary grinder with a diamond coated tip to remove the coating from the pads, exposing bare copper. I want to be sure that solder adheres to both the pin and the base pad. I want to make sure that the jumper wire makes a good connection with both the pin in the pad to go to the repair it’s best chance of success. Sometimes through holes like this go to multiple layers on the board, so there may be other connections that are not so obvious when looking from the top.
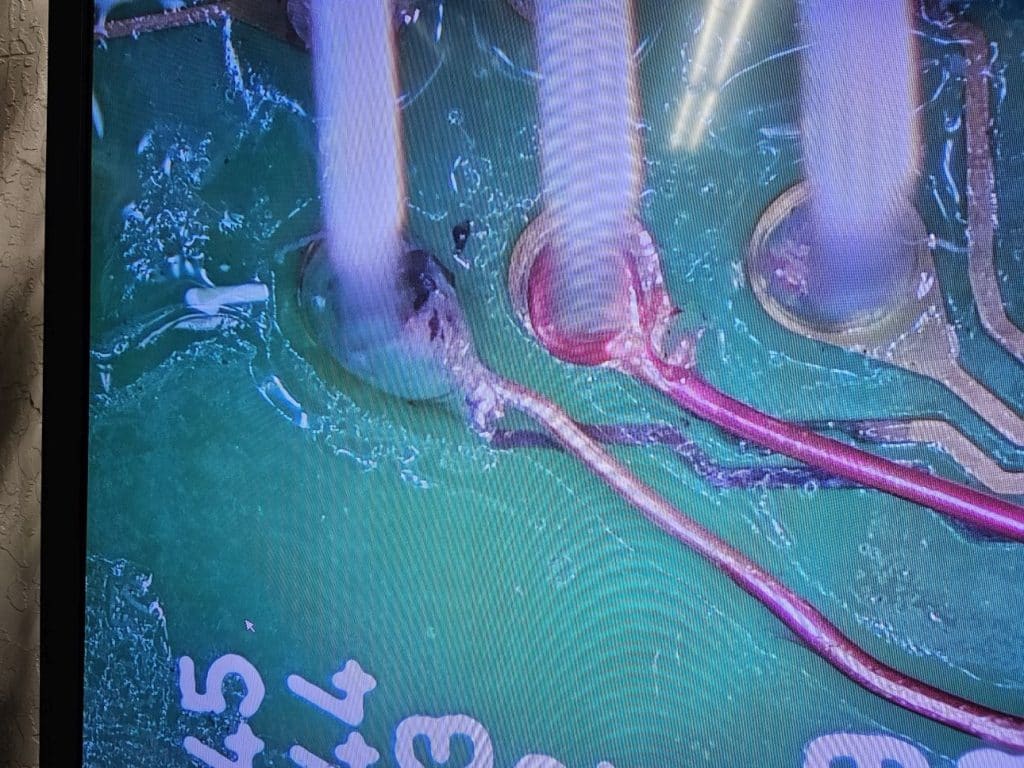
Next I solder insulated magnet wire to the pads and terminals. The magnet wire is 0.006″ thick, about twice as thick as a human hair. This is actually much larger than it needs to be, but as Tom Lipton from Ox Tool says, ” Nothing too strong ever broke”. Besides, it’s a little easier to work with. You don’t have to worry about breathing a little too hard and watching it fly away.
Here are the completed jumpers. I have also tested all of the pins to all of their termination points to make sure that there are no other broken traces that aren’t as obvious.
The final touches
To finish the repair, I use UV cure solder mask to cover the jumper wires. This does a couple of things. First it acts as insulation to prevent any exposed wire from shorting. I use solder mask to glue things in place so that they’re not affected by vibration. The vehicle is a high vibration environment, and while these jumper wires don’t have a lot of mass they do have some. I don’t want than to flex or move and eventually cause a joint to break.
For those worried about this being a high voltage component, don’t. Terminals and components are laid out in such a way that potential between terminals traces and components near each other is very low.
Final Thoughts
Hybrid trouble codes P0B3D, P0B42, P0B47, P0B4C, P0B51, P0B56, P0B5B, P0B60, P0B65, P0B6A, P0B6F, P0B74, P0B79, P0B7E, P0B83, and P301B are never directly caused by a faulty hybrid battery. It’s possible replacing the hybrid battery may correct one of these codes but only because the battery comes with a harness that can cause these codes.
Unfortunately Toyota does not sell the sense wire harness separately on the 3rd generation Prius. You have to buy the battery if you want the harness, which is unfortunate. You could certainly make the argument that replacing the harness is pointless because the battery is still leaking acid, and the acid will eventually undo whatever repair you make. However, I think that’s the choice that ought to be left to the car owner. Maybe he or she only wants another year or two out of the car. It ought to be the owner’s choice. Forcing someone to buy a $2,700 part to get the $70 part they need isn’t fair in my opinion.
However, if you were to look for a silver lining in this situation, there’s this. Since the $70 harness is attached to a $2700 battery, it’s covered under mandatory PZEV warranty in California. So if you have this issue prior to 10 years or 150,000 miles, then Toyota will fix it for free. If they sold the harness separately, and it were to fail within the PZEV warranty period, you might need to pay for the repair yourself.