Subaru vehicles 2013 – 2019 have some issues with camshaft control and correlation codes. To be fair, all cars do to some extent, and most of the time it’s the owner’s fault. Low oil level and poor oil condition will wreak havoc on oil-controlled systems like variable valve timing (VVT), and nearly every instance of VVT trouble starts with poor oil maintenance. However, Subaru has some issues most others don’t due to poor programming and documentation, and we’ll discuss that in a bit.
Oil Maintenance Is the Root Cause of Nearly Every VVT Code
A check engine light and VVT codes are the “canary in the coal mine” for low oil pressure. It’s often the first thing people notice. If there’s no oil pressure because there’s no motor oil left in the sump, the VVT will stop working. Why? The VVT sprockets are controlled with oil pressure. When the oil level is low and oil sloshes in the pan due to cornering or braking, the oil pump runs dry and the VVT can’t do its job.
Many times, changing motor oil and clearing the trouble codes is all that’s needed to solve the issue. However, chronic lack or oil maintenance can create problems that won’t be fixed by adding a couple of quarts and sometimes Subaru’s engine control module (ECM) is unable to recover from the changes it made while trying to correct its inability to control cam timing while starving for oil. Here are the typical problems:
- Sludge from lack or oil maintenance can cause sticking in the VVT sprockets and VVT solenoid control valves.
- Metal shavings created by dry camshaft bearings can clog the filter screens for the VVT control valves.
- Some engine control units (ECMs) can’t recover from a major correction in cam timing (the Subaru-specific problem)
Common Subaru VVT Trouble Codes
- P000A “A” CAMSHAFT POSITION SLOW RESPONSE BANK1
- P000B “B” CAMSHAFT POSITION SLOW RESPONSE BANK1
- P000C “A” CAMSHAFT POSITION SLOW RESPONSE BANK2
- P000D “B” CAMSHAFT POSITION SLOW RESPONSE BANK2
- P0011 “A” CAMSHAFT POSITION-TIMING OVER ADVANCED OR SYSTEM PERFORMANCE BANK1
- P0014 “B” CAMSHAFT POSITION-TIMING OVER ADVANCED OR SYSTEM PERFORMANCE BANK1
- P0021 “A” CAMSHAFT POSITION-TIMING OVER ADVANCED OR SYSTEM PERFORMANCE BANK2
- P0024 “B” CAMSHAFT POSITION-TIMING OVER ADVANCED OR SYSTEM PERFORMANCE BANK2
- P0016 CRANKSHAFT POSITION-CAMSHAFT POSITION CORRELATION BANK1, SENSOR A
- P0017 CRANKSHAFT POSITION-CAMSHAFT POSITION CORRELATION BANK1, SENSOR B
- P0018 CRANKSHAFT POSITION-CAMSHAFT POSITION CORRELATION BANK2, SENSOR A
- P0019 CRANKSHAFT POSITION-CAMSHAFT POSITION CORRELATION BANK2, SENSOR B
How To Diagnose Subaru P0016, P0017, P0018, and P0019
As I mentioned earlier, checking the motor oil level and condition should be the first step in diagnosing VVT codes. For us, it’s also helpful to know if the motor oil was previously low, since that points to why the problem occurred.
The next step is to check cam timing using the Subaru Select Monitor 4 (SSM4) or enhanced scan tool.
1. Chain Timing Check
- Clear Memory
- Use SSM (Subaru Select Monitor) to clear any stored memory.
- Disconnect Oil Control Valve
- Unplug the oil control valve (AVCS) connector.
- Note: A DTC (Diagnostic Trouble Code) will appear, but this is normal for this check.
- Start Engine & Check Timing
- Start the engine.
- Within 10 seconds, use SSM to check the “VVT Adv. Ang. Amount” (Variable Valve Timing Advance Angle Amount) at idle.
- Reference value: 0 degrees for most models. (27 degrees for 2014-2015 Forester 2.0 Turbo)
- Evaluate the Reading
- Is the “VVT Adv. Ang. Amount” more than ±10 degrees from 0? (or from 27 on the 2014-2015 Forester 2.0 Turbo)
- Yes: Chain timing is off. Correct the chain timing.
- No: Chain timing is OK. Proceed to the next diagnostic step.
- Is the “VVT Adv. Ang. Amount” more than ±10 degrees from 0? (or from 27 on the 2014-2015 Forester 2.0 Turbo)
- After the Check
- Reconnect the connector.
- Record the “VVT Adv. Ang. Amount” for use in the next steps.
2. Install A New Solenoid Valve (Or Swap Bank To Bank)
- Replace the Oil Control Valve
- Install a new oil control valve, or swap sides if the valve are the same bank to bank.
- Clear Memory
- Use SSM to reset/clear stored error codes.
3. Verification of Repair
Using MODE6 Data For Repair Verification
- Clear Memory
- Use SSM to reset error codes.
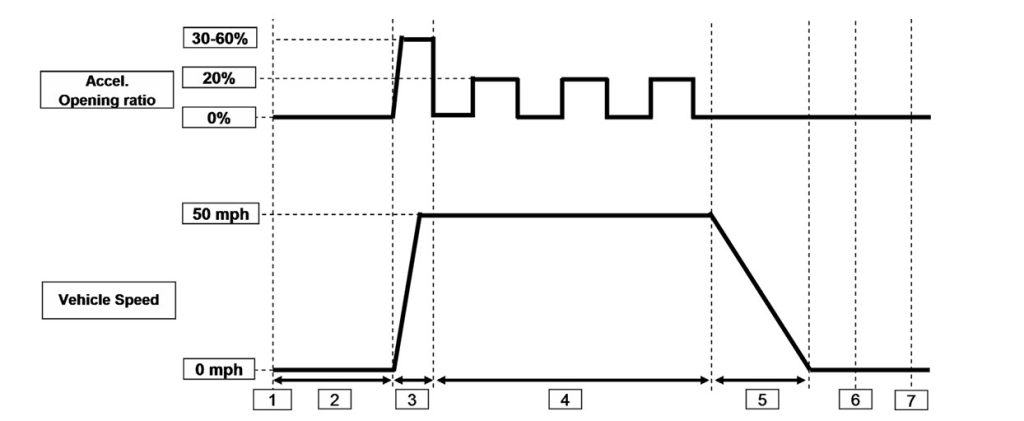
- Perform Drive Cycle – Follow this drive cycle to activate AVCS diagnostics
- Warm up the engine to ≥160°F (coolant temperature).
- Idle for 3 minutes.
- Drive at ~50 mph for 20 minutes, alternating between:
0% throttle (coast) for 5 seconds.
20% throttle for 5 seconds. - Decelerate to a stop and idle for 30 seconds.
- Collect MODE6 data
- Connect Subaru Select Monitor 4 (SSM4)
- Navigate to OBD Mode $06 > Monitor ID (MID) $35/$36 (Bank 1/Bank 2)
- Locate TID $8B/$8C/$8D/$8E
- Record “Val.” (Diagnostic Value) for $8B, $8C, $8D, and $8E
- Interpret Results
- If the value is 1000 or greater, there is a problem. However, if you swapped solenoids see if the problem is on the same bank as it was. Use the information below to identify the bank and cam.
- MID $35 = Bank 1
- $8B & $8C = B1 intake (P0016)
- $8D & $8E = B1 exhaust (P0017)
- MID $36 = Bank 2
- $8B & $8C = B2 intake (P0018)
- $8D & $8E = B2 exhaust (P0019)
- MID $35 = Bank 1
- If the value is less than 1000, then the next step is to compare it against the other bank and see if it is “very” different. There is a formula to determine whether the two banks are too far apart.
- Obtain the opposite bank’s value (Y).
- Example: If diagnosing Bank 1, use Bank 2’s value.
- Calculate the threshold (Z):
- Z = (Y × 1.5) + 100
- Failure if:
The suspect bank value from MODE6 is greater than the value you calculated for Z - Example:
- Bank 1 (X) = 900, Bank 2 (Y) = 300
- Z = (300 × 1.5) + 100 = 550
- Result: 900 > 550 → Failure
- Obtain the opposite bank’s value (Y).
- If the value is 1000 or greater, there is a problem. However, if you swapped solenoids see if the problem is on the same bank as it was. Use the information below to identify the bank and cam.
Don’t Like Math? No Problem. Here’s a Calculator
If you’re like me and you don’t enjoy doing math, you’re in luck. I had Perplexity AI create an ACVS calculator plugin that returns a “good” or “bad” result based on the numbers you enter. Give it a try. I compared it against a few samples I calculated out and it seems to work.
It’s 2025 and I’m still blown away you can tell AI you want to put a calculator on your website that does the calculations described on a PDF copy of a TSB, and it will crank out a WordPress plugin that works on the 1st try that an idiot like me can install in 5 minutes. These coming years are going to be a trip.
This is where one of two serious documentation issues decrease our ability to effectively diagnose and repair Subaru cam position codes. During our check to see if the timing chain had stretched or jumped in step 1, we were advised to take note of the “VVT Adv. Ang. Amount” we found in live data so we could use it later. Here’s what we’re supposed to do with it:
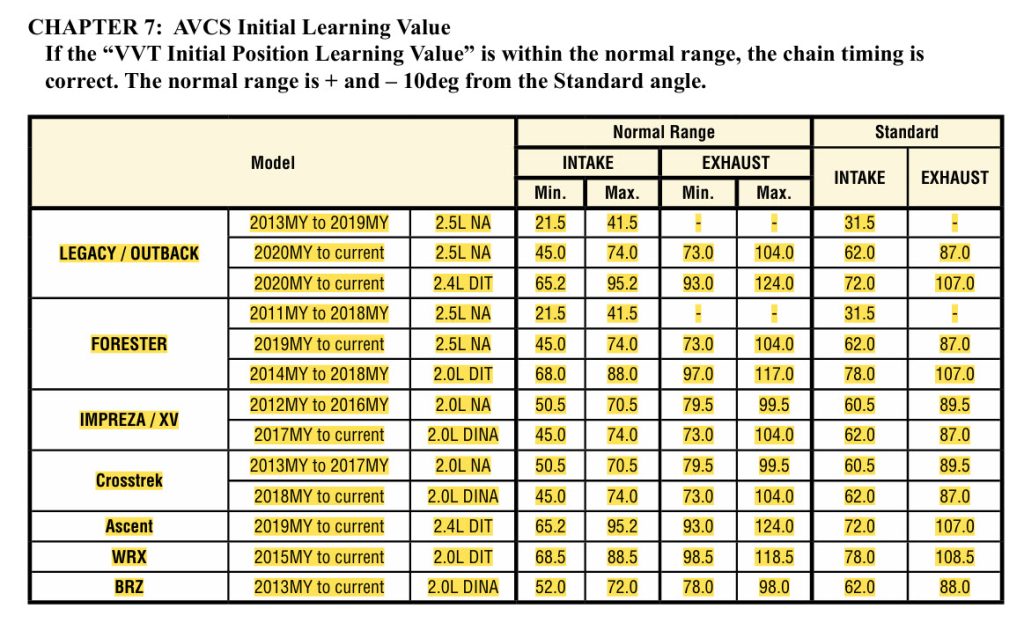
Add VVT Adv. Ang. Amount to VVT Initial Position Learning Value and compare the sum to the information provided in chapter 7 of the TSB. If the sum is “normal”, then we should replace the ECM, which isn’t actually necessary, but apparently Subaru engineers and Subaru training don’t talk much. This is Subaru’s second major documentation screw up, and we’ll talk about that in a bit, but for now, here’s the problem with using live data for diagnosis:
In chapter 7, there is no specification for “VVT Initial Position Learning Value” + “VVT Adv. Ang. Amount”. Instead, there is a chart with normal values for VVT Initial Position Learning Value only. There is no information about what the sum of the two values should be.
Reddit user u/Chippy569 probably has one of the best descriptions what we’re really looking for with this test. It’s a great post. Check it out. But here’s the meat of it:
“The ECM needs to learn what the “offset” or “default” position of the camshaft is, in degrees. This value can be updated every time the car starts, which it will tend to slowly do in the Advance direction as wear naturally occurs to the engine. However, it is very slow to update in the retard direction. Thus, if you’ve had a fault causing the camshaft to be sticky in the advance direction, the ECM can errantly “learn” a bad value for your camshaft, usually leading to an Over/Under Advance Family error code.”
This is why the ECM needs to be replaced. If the VVT sticks advanced and the ECM learns the base timing position incorrectly, it’s nearly impossible for it to relearn the correct position because it has trouble adjusting in the retard direction. The ECM refuses to forget, so it needs to be replaced. (Luckily there are a couple of ways to avoid ECM replacement).
So Chippy569’s take on this test is that the “Initial VVT Position” PIDs for the left and right banks (intake to intake and exhaust to exhaust) should be within 10 degrees of each other and within 10 degrees of the default value. Now, the TSB certainly doesn’t say this, but that seems plausible, and since he’s a Subaru dealer tech, I’d guess that it’s something that he learned in training (Subaru has a great training department) or maybe it’s something he’s learned from experience.
How To Fix P0016, P0017, P0018, and P0019 Without Replacing the ECM
One method to fix and ECM that refuses to adjust the timing in the retard direction is to rewrite the EEPROM chip in the ECM with a virgin file. This takes a bit of time and knowledge. If you’re interested in what this is and how it works, check out my tale of Subaru immobilizer woe. Anyway, this is no longer necessary due to some awesome work by ThePracticalMechanic.
So here is Subaru’s other major failure in documentation. This is a function that was engineered into the car. This isn’t a hack. Well, it is hack because it’s not documented and it got figured out anyway, but it’s engineered functionality. The crazy part is that it was somehow completely forgotten. The engineering team and the documentation team apparently never talked about it.
Anyway, I’m not going to tell you how to do it. Instead, I’ll send you to the guy who was partially responsible for figuring this out. He deserves the credit for the discovery. Here’s a link to the video where he explains and demonstrates how to reset the ECM when a P0016-P0019 can’t be cleared because of learned values that can’t be corrected by driving.

This guy is a hero. Can you imagine how many people have saved $1000 or more because of the work he did? Engineers get bonuses and promotions for figuring out how to save a dollar per car. There are 6.7 million 2013-2019 Subaru vehicles worldwide. Even if only 5% ever have this problem, he has potentially saved Subaru owners $335,000,000.
Other Cam Code Diagnostics
Not every camshaft fault is going to be a weird Subaru issue. Sometimes you’ll find plain ol’ vanilla issues. In the interest of completeness, here are the other things you should check.
Check The Oil Screens / Filters in the Oil Lines
Subaru frequently uses screens in the banjo bolts for the oil lines on their cylinder heads. Check the service manual for their locations and remove and inspect them. Sometimes, unfortunately, they’re not very accessible.
Check The Engine Oil Pressure
If the engine oil pressure is lower than specification (typically > 10 PSI at idle and >30 PSI at 3000 RPM with a warm engine) then find and correct the cause of the low oil pressure.
Check the Harness and Connectors
- Check the harness and connectors for the:
- solenoid valve
- cam position sensor
- crank position sensor
- ECM
Use loaded harness testing methods for checking the wiring. Ideally use a pin fit gauge for checking the female terminal and visual inspection for the male.
Or better yet, us an oscilloscope to monitor voltage and current while using an active test to operate the command the solenoids. This kills a lot of birds with a single stone.
However, I wouldn’t waste too much time with electrical testing because it’s less to be your problem in my experience.
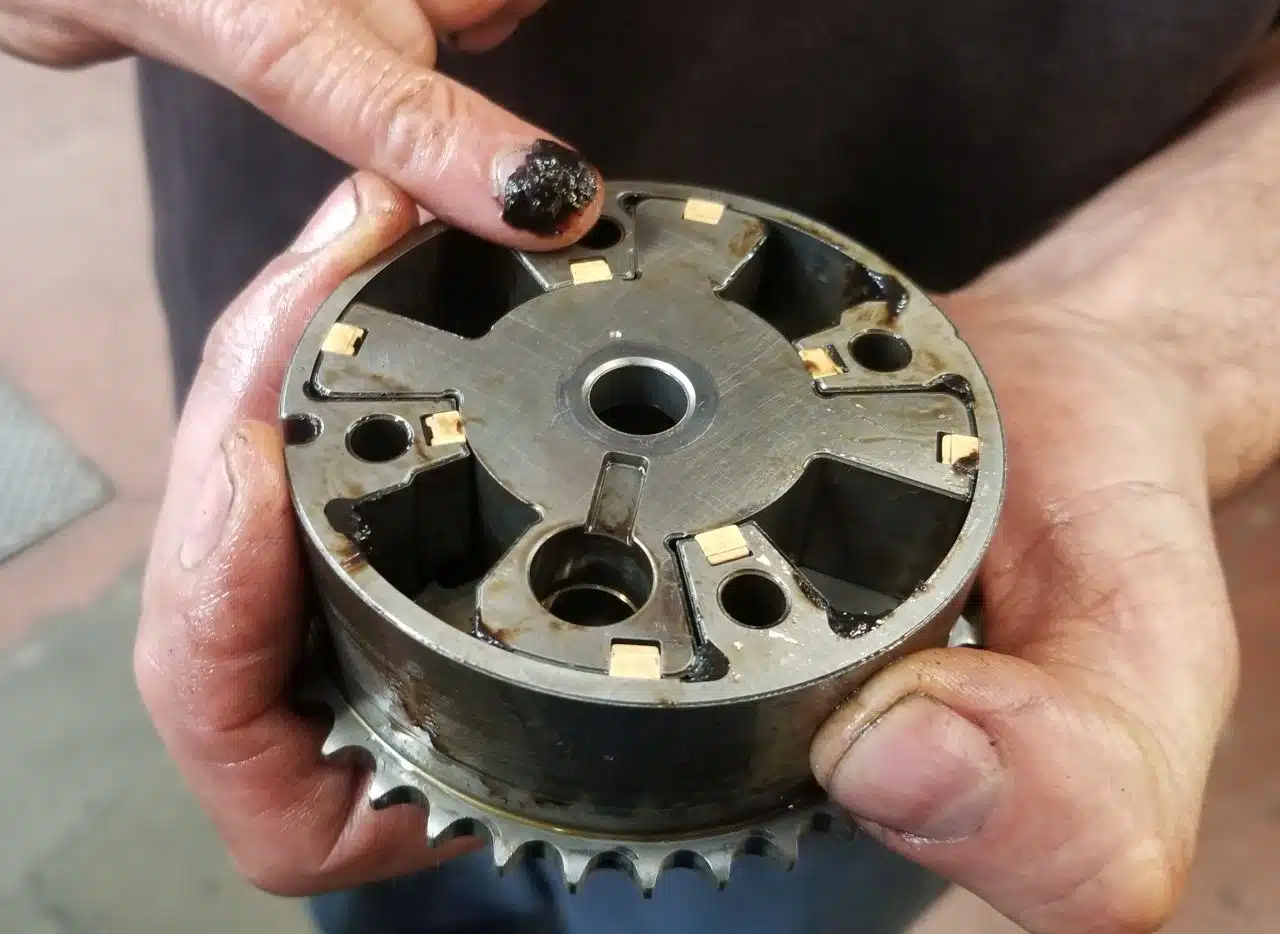
Replace The Suspect VVT Sprocket
This falls under the “not cheap” category, so you’ll want to eliminate other possibilities first. The picture on the right is from a Prius, not a Subaru, but these are all pretty much the same.
Oil doesn’t really flow through them. The same oil is just pushed back and forth between the chambers. If there’s sludgy oil in the in the sprocket, it’ll probably just stay there and continue to gum things up.